Pages

Friday, July 6, 2012

First Baby Shower Quilt

Some of our friend's are expecting a baby in September, and their baby shower is going to be on July 14th. When I first heard about it, I was thinking of onesies, binkies, and toys, but then I remembered, hey, I could just sew a quilt! 


I immediately searched online for some fabric. They're having a boy, and his dad loved trains when he was a kid so I wanted to incorporate that into it as well. I also wanted to try something new on this quilt, appliqué either a train or his name in the middle section, but then I thought better of it, since the shower was only three weeks away, and I didn't want to start a big endeavor that could potentially be very bad. I settled on two charm packs and some yardage from the Scoot collection from Riley Blake I purchased online from Missouri Star Quilt Company. They sure do have some adorable fabric lines for kids blankets, don't they?


I did try one thing I hadn't done before: double, or peek-a-boo binding. I didn't look up any specific technique for it, I just cut two different sized binding strips (2" and an 1 1/2" I think) and bound them at the same time. I really liked how it turned out. The inside or "peek-a-boo" fabric is colorful and fun (and would also get quite dirty if it was the only binding), and the back binding incorporated the backing material in the front as well. The only downside to that was now the back is entirely the same fabric, but I considered it awhile before making the decision, and I think this was better in the end.


Since I hadn't made a baby blanket before, and I have no children of my own to give me reference, I got out my own baby blanket that my mom made, and used that to measure about how big it should be. I also used two layers of batting. It didn't turn out exactly as I imagined it would, but it's still very manageable and folds up nicely without being too bulky, I guess we'll just have to see how much mama and baby like it!

She made me a bunch of colorful pinwheels :-)

It was entirely hand stitched. She began a heart/bow border,
but it only goes about halfway down one edge.
Still love it dearly though :-)


I was amazed how quickly the whole quilt came together. Obviously it isn't a painstaking design, and I only did a few straight lines of quilting to finish, but I had it together in just a few hours of a Sunday morning! The binding did take a little longer, because I hand stitched it to the front, but still only took me about a day or so for that. I have noticed myself getting better at hand stitching each time I sit down to do it. And by that, I don't just mean the stitching is prettier. In fact, I think the stitches I make are quite uneven and ugly, I generally go for a sturdy finish instead of a pretty one (I should probably get a book on this so I can learn the technique), but I have gotten quite a bit faster, so my productivity is better. I'm still a very long way from  hand quilting something, or perfect embroidery.

I'm in the process of planning a new quilt now. I have quite a bit of fabric that I bought for a specific design, but the more I look at it, the more I don't think it will work like I want, so I'm scrapping that and going back to the drawing board. Hopefully I have something figured out soon so I can get back in the sewing room! It was starting to collect dust in there!

Tuesday, February 14, 2012

Bella Solids VS Kona Cotton Solids

Ladies, I need your help. I am in the need of several yards of solid background white (ish) - and I am at a loss which fabric to use. Looks like most bloggers talk about the Kona Cotton Solids by Robert Koffman, but I only have experience with Bella Solids by Moda, which have worked beautifully for me in the past.

Which do you guys prefer, and why? Looks like at the Fat Quarter Shop online store they are both $6.99 a yard...Also I am tempted to buy one of those color cards so it is easier to order online. Have any of you used both?

Please let me know, I am at a loss which to purchase.

Also, any preferences on which white to use? Looks like there are lots to choose from on both sides! The fabrics I'm using are teal/red/orange/dark gray, pretty bright colors, so I think any will look good (as long as it's not yellow tinted probably).

Will post soon more projects I've got going on, but until then...

Happy Quilting :-)

Saturday, January 28, 2012

Slow Progress

Last weekend I got my new open toe quilting foot, and immediately began (after ten minutes of practice) free motion quilting my disappearing nine-patch quilt.

Arrived earlier than expected!
Took awhile to assemble -- but I got it on and working,
that's what counts!!
Once I had all the right equipment, there was nothing to it! I'd tried (and horribly failed) to quilt with the same all-purpose foot that I'd used for everything -- unless you want a (sort of) straight line with ruffled layers of fabric, I don't suggest this method. I found free motion a little intimidating at first, and although I'm no pro, I did relax into it and it turned out to be a pretty nice way to spend a Sunday afternoon.

Close up!
I didn't really debate about a design, I pretty much just started quilting, and I actually love the design. There are definitely a lot of mistakes, and at one point the tension was a bit off-so I ripped those (not too many) and just sewed over. I really love how it turned out. So I finished quilting Sunday afternoon and attached the binding to the back. Since then every night I've been working on hand binding it while I watch my shows. It took me about a week of that, but it's finally done! Washed and laid on the bed (my first completely complete quilt). Here are some more pictures!

(The binding wasn't finished yet when I took these Saturday morning, it really did take forever!)

The backing up close


Its a square, so most of it is in this one
 I made it from 5" squares, so technically I could have used charm pack squares, but I cut them all from yardage I picked (laboriously) on a somewhat recent trip to Joanne. Not the greatest quality fabric, but I am satisfied for my first big project.

Thanks for stopping by my blog, hope to see you next time!!

Thursday, January 19, 2012

IT'S HERE!!!

Yesterday my new Janome DC2011 arrived in the mail. I purchased it on amazon.com (I purchase a LOT of stuff from amazon.com!). It was a surprise because I'd gotten a notification that it was going to be at least a day late from weather conditions, but it arrived right on time! I played around with it a little bit last night, after marveling at it's beautiful newness. It even smelled lovely and new!

So without further ado.....


This is the machine I was using, a borrowed machine from my mama:


And here is Miss Janome:


And her lovely accessories:


So far, it is a dream. It sews quickly, quietly, and straight as a board. I've never used a computerized machine before - in fact I was a little nervous about it - but so far, it's looking good! 

I made the decision to exchange machines after I encountered a few problems with the original machine I got (a Singer Talent from Joanne). At that time I didn't know squat about sewing, let alone quilting. A few things I like about this new machine as opposed to the others: speed control - will be good for free-motion. The assortment of feet - this machine came with all the feet I could ever need (except an open toe, which is on order from, you guessed it, amazon.com!). The outer left top swings open like a door, which could be helpful if anything gets jammed or tangled. There is plenty of quilting space to move and support for whatever I'm working on, though it also removes, in case you need something to wrap around (hemming maybe?). Drop Feed, 'nuff said. Tension adjustment. Setting for needle placement - the needle can be set to the left, right or middle of the throat plate. Easy loading and viewable bobbin (Singer had this, Brother did not - though the Brother is quite a bit older, I think). 

I'm excited to try some stitching techniques I've never tried before, and sewing different kinds of projects.

Here is some stuff I have to play around with in the next few weeks:
Reusnneries Deux by French General for Moda (Charm Pack)
Make Do and Mend by Michele D'Amore for Benartex (Charm Pack)
St. Remy de Provence by Robyn Pandolph for RJR Fabrics (Twice the Charm)


Happy Quilting!!

Monday, January 16, 2012

A Day of Setbacks and Triumph

Yesterday was a roller coaster for quilting. 

First I organized the few extra pieces of fabric I've acquired recently into a 'stash'. It all fits quite neatly into a plastic sack at this point. Then I went back to the sewing room (basically the craft room, it's the only room we have a big table), and started working on a few things.

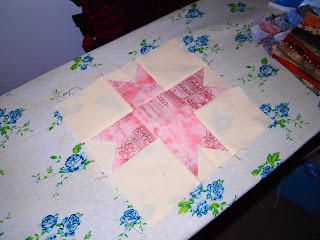
I've been planning to make an eight pointed star quilt, and have loads of pieces cut for it, though I'm not sure I did the greatest planning because the first 'test' block I got together was a mess:


This depressed me. I spent $50 on a whim fat eighth pack and started cutting away at it before I had any real idea of how to go about sewing the project. I am sure it is an easy enough fix, but it was downer number one of the night. 

Next up, I decided to make a notebook cover for the book I keep my quilting ideas in, and thought I'd use the tiny scraps left from the charm pack cuts I made for my Bow Tie Quilt. This was going well for awhile. I mean, how can you screw up when you're just sewing away tiny pieces and don't care what it looks like? 

UGH.

I had strips and tiny rectangles to work with and decided to do side by side strips along the bottom, like a fence to give it a base, and have the blocks sewn above in random order, but in strips and staggered (how did this plan arise after establishing complete randomization? Ah well, I guess complete whimsy is beyond me)...by the time I was done, I found I didn't actually have enough to cover the entire front of the notebook, but if I had been more careful and less artistic with my cutting I would have been fine. 


By this time I am extremely frustrated. It took a long time to sew a bunch of little tiny insignificant scraps together, and it was supposed to be a fun quirky project to take my mind off the OTHER disaster of the night. Didn't work. So after taking a brief break (surfing the web, and discovering the magic of pintrest), I went back in to work on my Bow Tie Quilt. 

I hadn't much done on it besides most of the cutting, and I'd sewn a handful of blocks (5 or so). I hadn't worked on it in awhile, instead finishing my pink and black disappearing nine patch quilt top and basting it last week and into the weekend. 

(Better pictures of this quilt to come...I really like how it's turned out so far)


Slowly and cautiously I began sewing, double and triple checking everything before making a seam, because frankly, I couldn't take anymore disappointments in one day! To my great surprise, everything went together smoothly and rather easily. I didn't even mess up once on sewing the diagonal line on the 'tie' bits, even once I'd stopped tracing the line (I am very proud of myself for this). 

I am LOVING this quilt. I think it is my best quality, most difficult, most snuggly, and most fun to work on than any of the previous quilts I've worked on so far. The material is so soft and almost silky feeling. I'm using the Birchbark Lodge charm pack from moda with a Bella Solid layer cake in Moda U. 


The idea for this quilt literally just fell together in my head. I'd been looking through TONS of quilting books and browsing blocks online, and had seen the bow tie quilt block...though I wasn't particularly drawn to it. I saw this woodsy, outdoors collection of fabric and knew I had to have it (reminds me of our beautiful Rocky Mountains, I'm from Colorado y'all). I tried to think of something that would be a challenge, but wouldn't overwhelm me, that would work with an entire line of fabrics, and the image of this quilt just popped into my head. 

I was actually originally thinking of arranging the blocks into rings, since I'm using four charm packs, I thought I could do a whole ring with each fabric, like this:


but now that I have several blocks together, I played around with the design a little bit. I think I've decided on this pattern instead:


This way I will complete another of my short term quilting goals: a setting on point!

After getting a few blocks together of this quilt, I was feeling a lot more cheerful and a whole lot more relaxed. I'm making it to go on our new bed (our supposed new bed, we will be getting a new one once we move, sometime later this year). As I mentioned before, I am using four charm packs and a layer cake, so this is probably going to be a biggun'! I may do a zig-zag esque border using the bow ties as well. I still need to purchase a backing and probably binding material, though I want them to be different. 
I LOVE the patterns on the fabric, I'm partial to the warm tones :-)

Here is the stack I have completed so far


I'm not sure if yesterday was a lesson in patience and perseverance, or a sign that I should sit down and make more practical and concrete plans before jumping into something...probably both!

Happy Quilting Everyone!!

P.S. Sorry about the quality of the pictures. That will teach me to wait until dark!!

Sunday, January 15, 2012

Introduction

Hello all you quilting folk out there who may stumble upon this amateur quilting blog, I am Emma, and I am learning to quilt.

I have only been quilting for about three months now, after receiving a sewing machine as an early birthday gift from my mom. We had purchased a Singer Talent from the local Joanne Fabric store, but after piecing a full quilt and fooling around with some scrap fabric, I found that quilting, even more so than crochet, has an infinite realm of possibility and creativity, and that I was going to need a more capable machine. Since I had only had the machine about two months by that point, I returned it, and have been using a spare of my mother's ever since (a Brother).

I don't have a strong background in sewing whatsoever. I tried patching a pair of jeans once - I sewed several lines of stitching over one another, by hand, and ended up with something not very pretty underneath, and with an uncomfortable seam. I've done very small works of cross stitch, but quickly lose patience with separating threads and re-threading needles, and the back never seems to look as good as it should. That's it. That's all I've done concerning a needle and thread until three months ago, when I got a sewing machine on a whim. One of my goals this year for quilting is to be able to stitch by hand, with at least some consistency and quality.

One of the things that surprised me at first about quilting, is the pure range of everything. There is low, medium, and high quality fabrics, and that just covers 100% cotton. There are many brands of machines and many types for different strengths in each. There are different mats, rotary cutters, and rulers. There are how-to-books, pattern books, and books with nothing but pictures of completed 'inspiration' quilts, not to mention threads. Beyond those obvious supplies, you also need an ironing board and iron (which I did not previously own if you can believe it). All in all, this is not a cheap hobby. This is probably the most budget consuming hobby I have ever undergone, but man is it fun.

Essentially I am beginning this blog to keep track of my quilting journey...the ups and downs, my completed projects, my goals, sharing my experiences, and inspiration (from other bloggers, of course!).

Happy Quilting Everyone!

Emma